Showing posts with label 1970s. Show all posts

Wednesday, 26 September 2012

Tom Baker doll


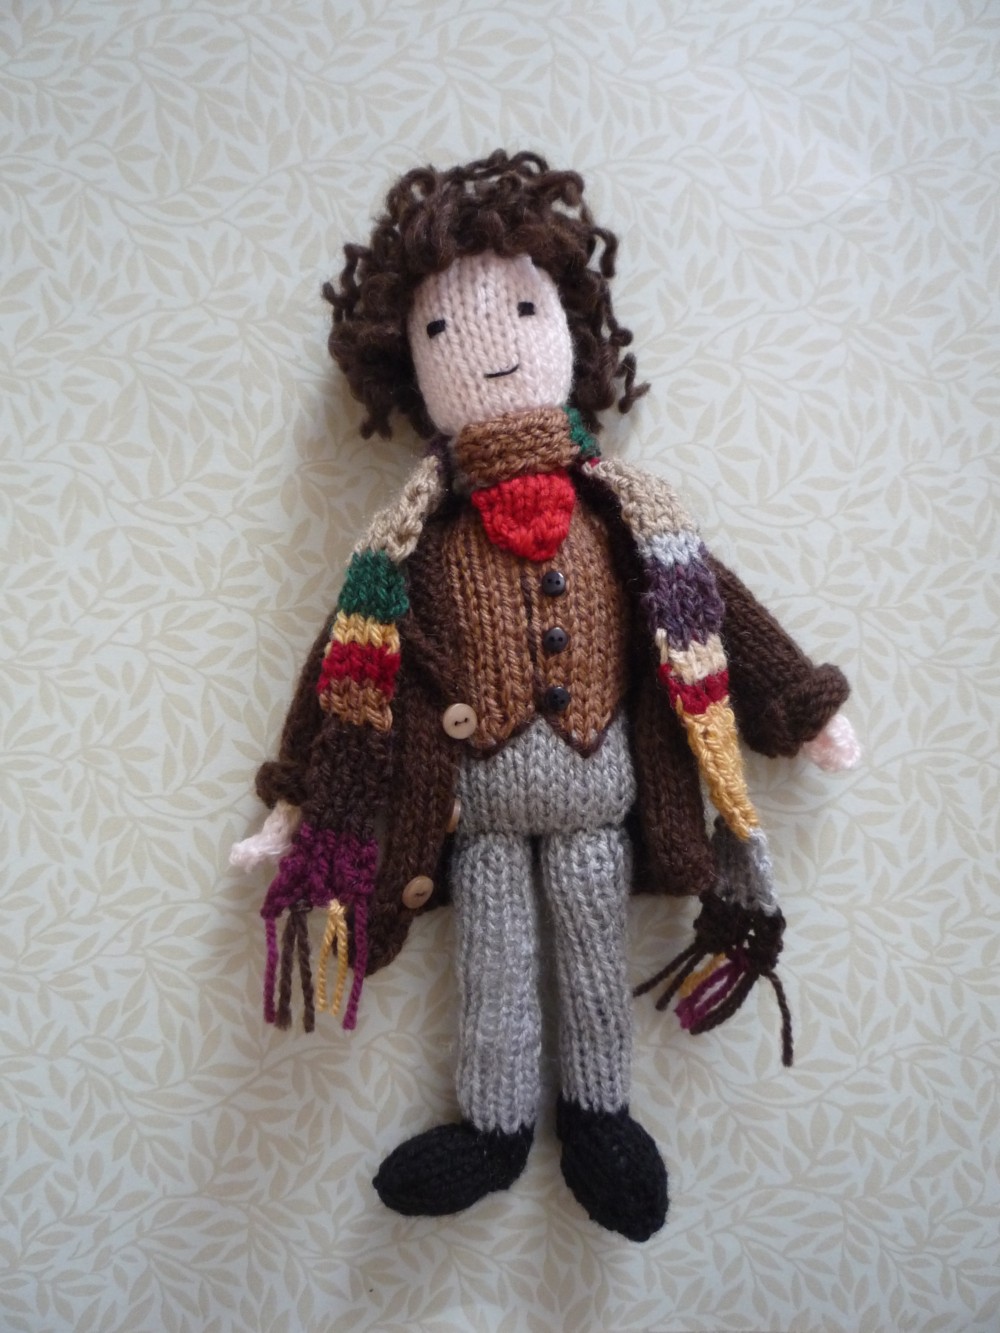
Here's my new Doctor Who doll! Tom Baker, the Fourth Doctor, scarf-wearing hero of my 1970s childhood.
He's wearing his trademark scarf, which I knitted using vintage 1970s yarn from deep in the depths of my yarn stash. You know you sometimes inherit ancient bits and pieces of yarn from friends and relatives? Hang onto it, this is what it's useful for.

I made his curly hair from alpaca wool, which holds a curl beautifully and looks pretty much like the Tom Baker mop in both colour and texture.

Tom Baker is currently for sale in my Etsy shop and I have also made another Matt Smith doll, also for sale. More Timelords to come!

Monday, 14 November 2011

Brown jumpers


Brown autumn jumpers. Here, two 1970s families model a variety of shades of brown, from yellowish to deep russet. Perfect camouflage if you are planning on hiding in a pile of leaves and jumping out and scaring people.

Children always look slightly uneasy in knitting patterns like these. You can tell that those people aren't really mummy and daddy. That little girl on the Templetons pattern is thinking "I'm holding a stranger's hand!" The little boy on the Ladywood pattern is having to pull off the double whammy of putting his hand on a strange girl's shoulder while looking amused that fake daddy is looking at fake mummy. Give him an Oscar!

Tuesday, 5 July 2011

Chadds of Lowestoft 1973 catalogue

Here is a rare glimpse into a world of 1970s acrylic wonder - the Chadds of Lowestoft yarn catalogue. With a vintage knitting pattern, you can only see the colours that the stylists chose to use for their cover photo, but this catalogue reveals the whole range of shades available to a 1973 knitter equipped with needles, knitting bag, and the Chadds Knitting For Leisure book.

You may want to put on some sunglasses now, before going any further.

Here we have a selection of colours available in Bri-Nylon Super Crimp (100% nylon). I think my favourites are Orangeade and Clematis.


Carlton Tricel Nylon (70% Tricel, 30% Nylon) sports an equally colourful rainbow of man-made colours:

Hopton 4 Ply (60% Courtelle, 40% Nylon) is probably the most vibrant of all, with Peacock and Signal Red still zinging off the page despite their age:


Babies, however, had to make do with this wishy-washy selection of pastel shades, in either 100% Cortelle ("wears and washes well so that any baby looks a dream") or in 100% Bri-Nylon ("for the mum who really cares"). Maybe the fear was that brighter colours would keep babies awake at night. They can progress on to Orangeade and Clematis when they are older, and stronger.

One point of local interest for me is that the happy bowlers on the cover are strutting their stuff in a bowling alley in Worthing, West Sussex - my home town. You can just make out posters for Supreme Fours, Worthing, and Ambassador Lanes, Worthing, behind young Hermione Granger, here.

Monday, 6 June 2011

Tank tops


From Patons Kingfisher, 4 ply crepe: cheeky 1970s ladies eyeing up each others bosoms, or rather, lack of bosoms.

"Clingy little crochet tops to suit your mood - one in a feminine lacy style with button-trim at waist, and the other in a slimline vest with a difference." The difference being a granny square worked into the front of the top.

I do like the matching hat, which is made out of five granny squares, and then worked round in double crochet (that's single crochet to those of you in the USA), decreasing as you go to make the top of the hat.

Monday, 9 May 2011

Battle of the Cushions


There's a lot to like in this collection of cushions from 1974's Family Circle Yours For The Making magazine. Clara Bow, the multi-coloured patchwork cushion, is a very glamorous way of using up a stash of scraps. That retro 1920s style with a 1970s twist is so evocative of the period and would look fantastic on a boudoir bedroom chair.


Mr and Mrs Panda, on the other hand, are minimalist amigurumi marvels. They are made out of felt, machine sewn round the edge seams, and eyes and face details are felt scraps stuck on with Copydex.

The Cottage Cushion hasn't aged as well (and is that an oil slick, or a dark spooky fog blighting the scene on the right hand side?). Esmerelda the Elephant is fun, but would look even better in a clashing 1970s floral fabric. For me, Mr and Mrs Panda win the 1974 battle of the cushions. I could make a joke about them knocking the stuffing out of the opposition, but I am feeling restrained and mature this morning, so I won't.

Tuesday, 5 April 2011

More disembodied heads


Yes, gentle reader, it's time for more disembodied heads. These two are probably the offspring of the two ladies who made their own Airlyne stair carpet. The girls have learnt to hover, ghost-like, above their knitted or crocheted ponchos worked up in ethereal cream. You'd certainly be in for a fright if one of these apparitions drifted through your wall, with no sound save for the gentle rustle of acrylic fibre.

Interested to see that this Twilley's pattern came from the Wool - Baa in Chadwell Heath, Essex. Was this a 1970s relative of Worthing's premier knitting shop, The Wool Bar? Or is it merely proof that there are only a certain number of wool-related puns in the world which we are destined to experience over and over again until we are released from this mortal coil and drift off to who-knows-where with a rustle of ponchos...

Wednesday, 16 February 2011

Woolworth's knitting advert

Happy, happy knitters from a Woolworth's advert, 1970s. "Strong yarns, wool yarns, nylon yarns. Yarns for babies, grannies, families, Winfield yarns, the best yarns".

The lady with the huge bag of wool seems to be knitting something white and tiny for a baby, whereas granny is creating a huge, stripy blanket. Or maybe it's one of those freeform jumpers for a grandchild that 1970s grans used to excel at. The ones where the sleeves went on for around a third longer than they should have done. The ones that barely fitted over your head.

Bonus points to the photographer for capturing gran's classic Carry On expression, and double bonus points with chocolate topping for taking the picture just as the bus was going past a Woolworth's store.

If you're a fan of 1970s knitwear, keep an eye out for second-hand copies of Woolworth's Knitting Magazine, which is a treasure trove of brightly coloured acrylic knitting and crochet patterns.

Tuesday, 25 January 2011

The young chemist at work


Now, I was never very good at Chemistry at school (miraculously scraped an E in my O Level) but I can confidently say that that is an enormous test tube full of copper sulphate. When we used copper sulphate in our Chemistry lessons, it was only ever dispensed in tiny, tiny quantities. Maybe that's because I went to a comprehensive school. This lad must be reaping the benefits of a private education: enough copper sulphate to bathe in.

I don't like the way he's looking so smug about it. Nice 4-ply hand-knitted v-neck jumper, though. I can't imagine hand-knitting school uniform these days.

Tuesday, 28 September 2010

1970s flower crochet hat


Here's the pattern for a hat to match this 1970s crochet scarf. It's so simple and pretty. You could even make the flower motif and attach it to an existing hat in your collection or use it to jazz up a shop-bought woolly hat.

You will need: 4 ply yarn for hat and contrast yarn for flower. 3mm and 3.5mm crochet hooks.

Tension: 6 tr = 1 inch in width measured over pattern on 3.5mm hook.

Hat: Using 3.5mm hook and main colour yarn, make 4 ch and join into a ring with a sl st.

1st round: Work 8 dc into ring, sl st to top of first dc to join. Do not turn.
2nd round: 2 ch ( = 1 tr), work 1 tr into first st, work 2 tr into each dc to end, sl st to 2nd of 2 ch.
3rd round: *Work 1 dc into first st, 2 dc into next st; work from * to end, sl st to 2nd of 2 ch.
4th round: 2 ch, work 1 tr into 1st st, *1 tr into each of next 2 dc, 2 tr into next dc; rep from * to last 2 dc, 1 tr into each of last 2 dc, sl st to 2nd of 2 ch. 32 tr.
5th round: Work 1 dc into each of next 2 tr, *work 2 dc into next st, 1 dc into each of next 3 sts; rep from * to last 2 sts, 2 dc into next st, 1 dc into last st, sl st to top of first dc. 40 dc.
6th round: 2 ch, work 1 tr into first st, *1 tr into each of the next 4 sts, 2 tr into next st; rep from * to last 4 sts, 1 tr into each st to end. 48 tr.
7th round: Work 1 dc into each of next 2 tr, *work 2 dc into next st, 1 dc into each of next 5 sts; rep from * to last 4 sts, 2 dc into next st, 1 dc into each st to end. 56 dc.
8th round: 2 ch, work 1 tr into each of next 4 sts, *2 tr into next st, 1 tr into each of next 6 sts; rep from * to last 2 sts, 2 tr into next st, 1 tr into last st. 64 tr.
9th round: Work 1 dc into first st, *2 dc into next st, 1 dc into each of next sts; rep from * to last 7 sts, 2 dc into next st, 1 dc into each st to end. 72 dc.
10th round: 2 ch, work 1 tr into each of next 5 sts, *2 tr into next st, 1 tr into each of next 8 sts; rep from * to lat 3 sts, 2 tr into next st, 1 tr into each of last 2 sts. 80 tr.
11th round: Work 1 dc into each of next 4 sts, *2 dc into next st, 1 dc into each of next 9 sts; rep from * to last 6 sts, 2 dc into next st, 1 dc into each st to end. 88 dc.
12th round: 2 ch, work 1 tr into first st, *1 tr into each of next 10 sts, 2 tr into next st; rep from * to last 10 sts, 1 tr into each st to end. 96 tr.
13th round: Work 1 dc into each of next 3 sts. *2 dc into next st, 1 dc into each of next 11 sts; rep from * to last 9 sts, 2 dc into next st, 1 dc into each st to end. 104 dc.
14th round: 2 ch, work 1 tr into each of next 2 sts, *2 tr into next st, 1 tr into each of next 12 sts; rep from * to last 10 sts, 2 tr into next st, 1 tr into each st to end. 112 tr.

Work straight in alternate rounds of dc and tr until hat measures 6 inches from last increase ending with a round of dc. Fasten off.

Make a flower centre and 6 petals as detailed in the pattern for the floral scarf.

To finish: Sew centre of flower to centre top of hat. Sew on 6 petals evenly spaced around centre of flower.

Friday, 3 September 2010

1970s crochet flower motif scarf


Here's an autumn crochet project from Woolworths Magazine from the early 1970s. It's a simple fringed crochet scarf which is given a little zip with a super-cute crocheted vintage flower motif. The flower is worked separately, so you could always just make the flower and add it to a scarf, hat or bag of your choice.

To go back to the 1970s, you will need 4 ply wool in main and contrast colours. 3mm and 3.5mm crochet hooks.

Tension: 6 tr = 1 inch in width measured over pattern on 3.5mm hook.

4 ply wool is harder to find these days, so try substituting DK yarn and use a smaller hook.

Using 3.5mm hook and main colour make 51 loose ch.

1st row: Work 1 dc into 2nd ch from hook, 1 dc into each ch to end. 50 dc.
2nd row: 2 ch, work 1 tr into each dc to end.
3rd row: Work 1 dc into each tr to end, working last dc into top of 2 ch at beg of previous row.

Repeat the last 2 rows until scarf measures 80 inches from beginning (or indeed, the length you want - let's go crazy here). Fasten off.

Fringing and edging: Using a 3.5mm hook and main colour, work 1 dc into each dc row and 2 dc into each tr row, work along both long edges of scarf. Using main, cut strands of yarn approx 18 inches in length, fold in half and draw bundle of 3 strands through 1st st at one end of scarf. Draw ends through loop and tighten, forming one tassel. Repeat through every alt st of shorter ends of scarf.

Flower motif: centre of flower: using 3mm hook and main, make 4 ch and join into a ring with a sl st.

1st round: Work 8 dc into ring, sl st to top of 1st dc to join. Do not turn.
2nd round: Work 2 dc into each dc to end, sl st to join.
3rd round: *Work 1 dc into 1st st, 2 dc into next st; rep from * to end, sl st to top of first dc.
4th round: Work 2 dc into first st, *1 dc into each of next 2 dc, 2 dc into next dc; re from * to last 2 dc, 1 dc into each of last 2 dc, sl st to join. 32 dc.
5th round: Work 1 dc into each of next 2 dc, *work 2 dc into next st, 1 dc into each of next 3 sts; rep from * to last 4 sts, 1 dc into each st to end, sl st to join. 40 dc.
6th round: Using contrast yarn work 2 dc into first st, *1 dc into each of next 4 sts, 2 dc into next st; rep from * to last 4 sts, 1 dc into each st to end, sl st to join. 48 dc.
7th round: Using contrast work 1 dc into each of next 2 dc, *work 2 dc into next st, 1 dc into each of next 5 sts; rep from * to last 4 sts, 2 dc into next st, 1 dc into each st to end. 56 dc. Fasten off.

Make another centre the same.

Petals: Using 3mm hook and contrast make 9 ch.

1st round: Work 1 dc into 2nd ch from hook, 1 dc into each of next 6 ch, 3 dc into next ch, continue along other side of ch working 1 dc into each of 6 ch, the 2 dc into last ch.
2nd round: 1 ch, work 2 dc into first st, 1 dc into each of next 7 dc, 3 dc into next st, work 7 dc, 2 dc into next st, work 1 dc.
3rd round: 1 ch, 2 dc into next st, work 9 dc, 3 dc into next st, work 9 dc, 2 dc into next st, work 1 dc.

Continue increasing 4 sts in this way by working 2 more dc between incs, at the same time working in the following colour sequence: 1 round contrast, 2 rounds main, 2 rounds contrast. Fasten off.

Make a total of 12 petals.

To finish: Sew centre of flower to each end of scarf approximately 4 inches up from fringed edges. Sew on 6 petals evenly spaced around centre of flower.

Tuesday, 29 June 2010

1970s puzzle rug

Tarquin: "Mummy, look, the dog lent me his craft knife and we cut this square out of the rug!"
Mummy: "How creative, darling! I knew it was worth sending you to that Montessori school."

Actually, no. This is a 1970s latch hook Puzzle Rug made out of identical motif squares, which you can arrange and re-arrange to your heart's content before committing to sewing them together to make one big eye-spinning geometric floor-covering.

Home Handicrafts by Mary Harding offers plenty of different pattern ideas to get you started:


The book suggests that you can unpick the squares and sew up again into a different pattern, or a different shape entirely - you could make a runner for a hall, two squares wide and eight squares long, or a smaller hearth rug of three by five squares. Groovy.

Tuesday, 22 June 2010

1970s rainbow bedspread


Here's a gorgeously simple idea from Home Handicrafts (Mary Harding, Octopus Books, 1977). It's a rainbow bedspread, knitted in simple garter stitch - "Easy enough to knit without looking - although of course you can knit while watching television! Actually, the more exciting the story is, the faster your needles will click".

The bedspread is worked in strips and then joined together with a row of crochet. The bedspread in the book is worked in rainbow stripes and then joined with a black crochet border as a contrast. There's also this sophisticated version worked in shades of red:


What a brilliant stash-busting project!

The rainbow bedspread in the book is made of out 22 strips, each 16 stitches wide, and 140 cm long. You can work each strip to the length that you want, but make sure that each strip has the same number of rows, to make it easier to crochet together row by row.

Once you have worked the required number of strips, and crocheted them all together, work 3 rows of crochet round the edge of the bedspread, working 2 or 3 stitches in each corner stitch so that the corners will lie flat.

Tuesday, 15 June 2010

Make a velvet ribbon or braid belt


"Moneywise, fashionwise it's time to tighten our belts," says this early 1970s magazine article. As it was then, so it is now. If you have some odds and ends left over from another project, why not make a vintage-style belt?

Here's now to make the top Curved Braid Belt, made from two rows of braid machine-sewn to fabric. To fit a 61 - 71 cm waist, you will need 2m of 3cm-wide novelty open-weave braid, strips of toning fabric, lining and canvas each measuring 12cm by 91cm, a 6cm buckle, a press stud, matching thread.


Using squared pattern above, cut out a paper pattern in which each square = 5cm. 1.5 cm seams have been allowed throughout. Place pattern on fabric and cut out. Repeat with lining and canvas. Trim away seam allowance on canvas only. Cut braid into two equal lengths.

Leaving equal turnings along sides, place and pin the two lengths of braid centrally on to right side of fabric. Using matching thread, zig-zag or top-stich braid on to fabric. Tack canvas to wrong side of fabric. Wrap seam allowance of fabric over canvas along sides and ends. Tack and press in place. Oversew raw ends of thread before turning in to prevent fraying.

Pin wrong side of lining on to canvas and turn in all sides, covering raw edges of fabric to neaten. Press, hand stitch all round. At stright end of belt thread belt through bar of buckle and stitch end down on to back of belt. Sew press stud into position.

To make a Narrow Ring Belt:

By adding or substracting rings and adjusting ribbon length this belt can be made to fit any size waist. To make a 66 cm waist you will need: 1.5m of 1.5 cm wide black velvet ribbon, approx 48 brass curtain rings, fastening hook, matching thread.

To make: following above diagram, thread ribbon through rings to required length. Cut ribbon 2.5cm from the last ring at each end and turn back. Tuck in raw edge and stitch down. Sew hook on one end to fasten to ring at opposite end. With remaining ribbon make a small bow and stitch in place to cover hook.

Many thanks to Barbara for these brilliant belt patterns!

Tuesday, 8 June 2010

Hypodermic needle collage


A little oddity from a little 1972 Collage book (Search Press). It's a collage made from hypodermic needles.

"This charming and interesting design was made from the throw away products of the medical profession. It is included for general interest only, as few of us other than doctors, nurses, etc, would have access to such materials." (for "etc" read "junkies and smack addicts")

"It is, however, a classical illustration of the art of collage by showing how much improbable materials can create a most artistic effect. It cannot be impressed too much upon the reader that almost any waste product can be converted into interesting and exciting patterns."

Thursday, 3 June 2010

Ponchos for poppets


I am coming to the opinion that Patons Promise were the kings of brightly-coloured acrylic children's knitwear in the 1970s. They were the people who brought us these 1970s playsuits - the perfect undergarment for their knitted and crocheted "Ponchos for poppets".

The palm trees drawn in the background indicate a kind of tropical paradise, although obviously a tropical paradise blighted by a stiff, cold breeze. Our little poncho wearers are tucked up safe and warm and can enjoy their fully-dressed day out at the beach without fear of chill.

Saturday, 1 May 2010

Mr May


Two manly men this month. A Sirdar acrylic 4-ply woolie is just the job for chaps who are macho enough to brave the beer garden in the merry month of May.

The gentleman on the left in the "sleeveless slipover" reminds me a little of David Beckham, for some reason. Perhaps the canary-yellow trousers have something to do with it.

Looking at his friend's wristwatch, you can see that it is 4 o'clock, so maybe they are skiving off work.

Wednesday, 28 April 2010

Another doll that will kill us all


This little girl has been stopped dead in her tracks by the sight of Larry the Layabout, an adult-sized rag doll from Elsie Burch Donald's Book of Creative Crafts (Octopus Books, 1978).

Yes, Larry is wearing your father's clothes. Yes, you're right, Mummy never was quite herself after Daddy went to live in Wimbledon with that au pair.

The Book of Creative Crafts suggests, "If a change of gender is preferred, just omit the moustache". Three cheers for the 1970s!

Friday, 23 April 2010

Pimp my hide


Now let me make this quite clear, I hate fur coats. Unless they're on an animal, obviously. I would rather eat glass than wear one myself, savvy? I'm just interested in this ad from The Portsmouth News, 1970, from a thrift point of view.

These days, I can't imagine the Co-Op, or any other major clothing retailer offering the services of an expert who can remake and remodel your items of clothing to save you having to buy new ones from the shop.

Mr Victor Segall was offering "re-styling to modern fashion requirements", "cleaning and repairing, including replacing worn parts", the re-dying of faded furs, and, "fox furs and stoles made into cape stoles."

Wouldn't it be wonderful to offer this service today, not necessarily with furs, but with any item of clothing that no longer fits, or has worn out in places, but you still love the fabric and would like to see it transformed into something else? Wouldn't it be marvellous to have a Mr Victor Segall who could scoop your old coat up in his arms, suggest a few creative ideas, and return, say, a few weeks later, with a beautiful skirt and matching handbag made out of your cast-off?

Thursday, 22 April 2010

1970s playsuits


An easy way to make your child overheat on a sunny day - the 1970s knitted acrylic playsuit.

"Shimmering on the holiday scene in their dashing seashore sets - colour glow stripes for the trouser suits, worn over classic sweaters in the contrast colour. Super shimmery looks in Patons Promise".

If you run around and get too hot in this combo, what do you do? Take the jumper off and just wear the tank top and trouser all-in-one, I suppose.

Maybe these were designed for British seaside holidays, where you were more likely to be huddled behind a windbreak in the rain. That would make more sense.

Sunday, 18 April 2010

Loopy knitted hats from the 1970s


By the 1970s, we had lost the art of graceful, chic hats. This family of three may be very cosy in their Bellmans Double Knitting Snuggles, but elegance is not a word that springs to mind here.

Note how the boy on the left is being gently constrained to prevent him from running away.

Make a 1970s loop stitch hat for yourself - Buy a copy of this vintage 1970s knitting pattern for £1.50. You'll receive a link to download a high quality PDF document of this pattern upon payment.

Pattern is for Snuggle hats from ages 3 to adult. You'll need double knitting yarn, and a pair each of no7 and no 9 needles.